Recently some folks were asking about how to build a MODX Extra, in the community Slack. This is something I've done a few times. Arguably the most challenging part of building a MODX Extra is the actual packaging or "build" step. MODX uses a purpose-built packaging format that pre-dates Composer. While reliable and effective, writing the build script can be a bit tiresome.
Luckily, there's a fantastic tool, Git Package Management ("GPM") made by Jan Peca, a prolific and talented MODX core team member. I probably would not be releasing MODX Extras at anywhere near the same rate without GPM.
Despite some pretty good documentation however, the aforementioned Slack thread made it evident that a guide or tutorial for using GPM is needed. So here it is, as promised.
Requirements
- An installation of MODX—usually this is in your local development environment. While you could run GPM on a production MODX site, it's recommended to do this kind of thing on dev, away from prying eyes and expectations.
- GPM installed—here's how you do that.
- An Extra that you're trying to build. In this post we'll refer to the classic MODX example Extra: "Doodles".
NOTE: the "Doodles" documentation provides a dated-but-decent overview of how to develop a MODX Extra. This post is about the packaging, or "build" step. The traditional way of doing that is documented in step 3 of the Doodles documentation. This post desribes the "GPM way".
Repo / Template
The output of the steps in this guide are available in this repo on GitHub. You can actually clone or fork that repo and use it as a starting point for your Extra. While completely optional, it would not be frowned upon, to use the "Sponsor" button if you find this tutorial and the template helpful ;)
Getting Started
Directory Structure
There are multiple directory structures supported by GPM, as documented. This guide describes one such structure that has proven to work well, but you can choose whichever you prefer. You only need to set this up once, when you install and configure GPM. You can develop an arbitrary number of Extras in the same environment, without having to reconfigure your directory structure.
/modx/base/path/‹- document rootcore/‹- default location relative to document root (you can customize this but unnecessary in local dev)packages/‹- this is for GPM. Note: it's distinct fromcore/packages/.index.php‹- default MODX gateway, shown here for illustrative purposes only
Inside the packages/ folder you can symlink to your git repositories, if you store them in a different part of your filesystem.
/path/to/git/repos/‹- rungit clone https://github.com/sepiariver/gpmdoodles.gitgpmdoodles/‹- local repo where you rungitcommands
/modx/base/path/packages/‹- from here, runln -s /path/to/git/repos/gpmdoodles gpmdoodlesgpmdoodles/‹- this will be a symlink to/path/to/git/repos/gpmdoodles/
Upon installation, GPM asks you to configure the packages path and url. It then stores these values in System Settings:
gitpackagemanagement.packages_base_url(Packages base URL) -›/packages/gitpackagemanagement.packages_dir(Packages directory) -›/modx/base/path/packages/
Add Packages to GPM
Once the above is setup, you can navigate to "Extras » Git Package Management" in the manager. Click the "Add Package" button, and provide the name of your package's folder relative to the Packages directory. In this case it would be gpmdoodles. GPM attempts to read the config file at (relative path) gpmdoodles/_build/config.json. If the config file is valid, GPM will install MODX Elements such as Snippets, Plugins, System Settings, or whatever else you've configured for your Extra.
Common Issues
If adding your package fails, GPM tries to provide some helpful tips in the manager console, like:
Core config is not writable. Please make /modx/base/path/packages/gpmdoodles/config.core.php writable to continue.
In this case check your file permissions. The symlink(s) in the packages/ folder should be visible in the manager's File Tree. Also check for typos in your paths.
Elements: /modx/base/path/packages/gpmdoodles/core/components/gpmdoodles/elements/chunks/doodle.chunk.html - file does not exists
Config file is invalid.
In this case the config file is invalid and GPM lets us know why :)
Setting Up the Extra
The gpmdoodles repo contains some useful, but perhaps opinionated, bootstrapping and folder structures. The whys and wherefores of such are a topic for another post, however it's worth noting the folder structure as it pertains to GPM and the build process.
/path/to/git/repos/gpmdoodles/‹- all paths below are relative to this project folder_build/‹- contains GPM configuration and build files that do not get packaged with the Extraconfig.json‹- this is the important bitgpm_resolvers/‹- this gets created by GPMbuild.config.php‹- GPM creates this when adding the package in the manager—it should be in.gitignore
assets/components/gpmdoodles/‹- if your Extra requires assets to be publicly available, they should go here so they will be packaged with the Extra
core/components/gpmdoodles/‹- the other directory that gets packaged with the Extraelements/‹- the GPM build configuration looks in this folder for your MODX Elementssnippets/‹- such as Snippetsplugins/‹- and Plugins
model/‹- typical location for model filesdocs/‹- files used by the MODX package manager
test/‹- example of folder that is ignored by GPM in the build, and thus does not get packaged with the Extraconfig.core.php‹- GPM creates this in the project root when adding the package in the manager—.gitignoreit.
As you can see, GPM expects the folder structure of your Extra to comply with the Doodles convention. Note that the composer-generated
vendor/directory undercore/components/gpmdoodles/model/is checked into VC. The MODX Extras Installer doesn't runcomposerto manage dependencies.
Next, we'll take a look at the _build/config.json file, which can be found on GitHub here.
config.json
The Git Package Management docs describe in detail, the various configuration options available in _build/config.json. We won't repeat everything here, but will point out why gpmdoodles is configured the way it is.
General Section
name (string) The value of the property is used as the default MODX Category for all Elements in this Extra. It is also the name that shows up in the Extras Installer and on the MODX Extras directory.
lowCaseName (string) This is probably the most important property in the config file. Its value is used as the MODX Namespace for this Extra. As well, this value is used throughout the Extra. MODX, xPDO, and GPM all perform various functions that refer to this value. To conform with convention and prevent nasty bugs, it's best to use only lowercase alpha characters [a-z].
version (string) This value is used by the Extras Installer to determine if/when a new version of your Extra is available. Even if you don't plan to publicly release your Extra, you'll benefit from using a semantic versioning scheme like that of the MODX core. It makes upgrading in the Extras Installer work smoothly.
Package Section
package (object) This is usually the main body of the configuration, and it instructs GPM on how to package your Extra. We'll touch on the various subsections below.
Elements
elements (object) This object contains a child property for each type of MODX Element you want to include in your Extra. The full list of supported Element types, and the available properties for each, is available in the documentation. The ones we're dealing with here are: Plugins, Snippets and Chunks.
elements.plugins (array) An array of objects, each describing a Plugin. The properties we're concerned with are: name, file, and events.
{plugin}.name (string) The name of the Plugin that shows up in the MODX Manager. It has a unique constraint in the MODX database.
{plugin}.file (string) Here's where things get a bit more interesting. GPM looks for files in a specific directory relative to the project root: core/components/gpmdoodles/elements/plugins/ and uses them as the source for the static Elements that it creates in your development environment. When building the package, GPM uses these source files to create the transport vehicles that will deploy as database records (standard Elements) in the MODX site where the Extra is installed.
Ok that was a lot of words. Let's distill that. In our example GPM Doodles Plugin, the contents of the file doodles.plugin.php will become the Plugin code.
{plugin}.events (array) An array of strings, each is the name of a MODX Event on which you want your Plugin to execute.
elements.snippets (array) An array of objects, each describing a Snippet. The basic properties are: name and file.
{snippet}.name (string) The name of the Snippet that shows up in the MODX Manager. For Snippets, it's especially important as it's the name used to invoke Snippet execution. It has a unique constraint in the MODX database.
{snippet}.file (string) Similarly with other Elements, the contents of the file will become the Snippet code.
elements.chunks (array) An array of objects, each describing a Chunk. The basic properties are: name and file.
{chunk}.name (string) The name of the Chunk that shows up in the MODX Manager. Chunks are included by name. This field has a unique constraint in the MODX database.
{chunk}.file (string) The contents of the file will become the Chunk content.
System Settings
Sibling to elements is the systemSettings array. Each array member is an object describing a System Setting. The bare bones configuration includes key and value.
{systemSetting}.key (string) This is the key of of the System Setting. It will be prefixed with the package namespace separated by a ., so in our example api_url will be installed into MODX as gpmdoodles.api_url.
{systemSetting}.value (string) The default value of the System Setting on installation.
Database Section
database (object) This object instructs GPM to make modifications to the database as required by your Extra.
database.tables (array) An array of object class names. Note that these are not table names, but the names of the PHP classes that interact with the database by extending xPDO objects. This topic requires a bit of background information about xPDO database schemas, and how GPM interacts with them.
gpmdoodles.mysql.schema.xml
In our example project this file is located at: core/components/gpmdoodles/model/schema/gpmdoodles.mysql.schema.xml. xPDO schema as a topic is outside the scope of this post, but here are a few resources:
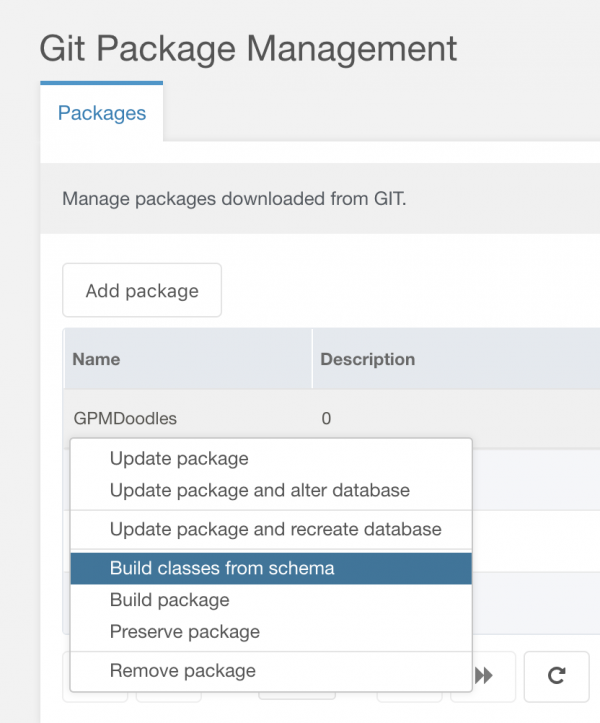
More relevant here, is how GPM consumes this file. In the manager under "Extras » Git Package Management", you should see the package that you've added to GPM. Right-click on it to reveal the context-menu.

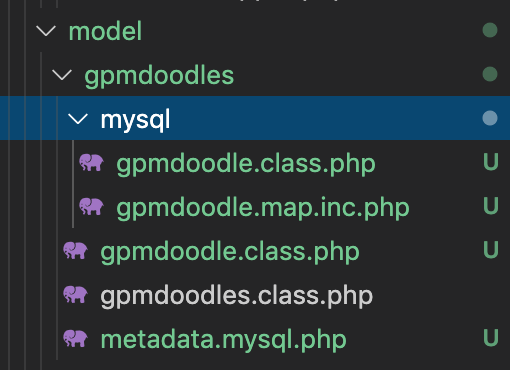
When you select the "Build classes from schema" option, GPM (using xPDO) generates xPDO class files based on your schema.

Right-click again and select "Update package". Now GPM will create the database tables defined in the schema.
Developing the Extra
That (perhaps confusing) bit we discussed above, with respect to static Elements, can be a help if you're familiar with it, or a hindrance if you are not. Here's a primer on MODX static Elements. When an Element is flagged as static, it references the static file on the filesystem. You can write to the file by editing the Element in the MODX manager.
Thus it follows that in the GPM setup described herein, you can modify the code in your Elements either using the MODX manager or using your IDE/text editor of choice. While this can be handy, it can also cause loss of work. Example:
- You make uncommitted changes in your IDE, but
- the Element view is open in the manager with stale data for that same Element, and
- then you hit "Save" in the manager, then finally
- you can say goodbye to your uncommitted changes.
It may be beneficial to make a rule for yourself: don't hit "Save" in the manager views for any GPM-managed Elements.
Once you have a workflow established, you'll be free to reap the significant benefits of having GPM managing your package in your MODX development environment. For example, you can set up some test Snippet calls, and simply refresh those Resources in your browser to observe the effects of your changes, even if you made those changes in your IDE.
Packaging the Extra
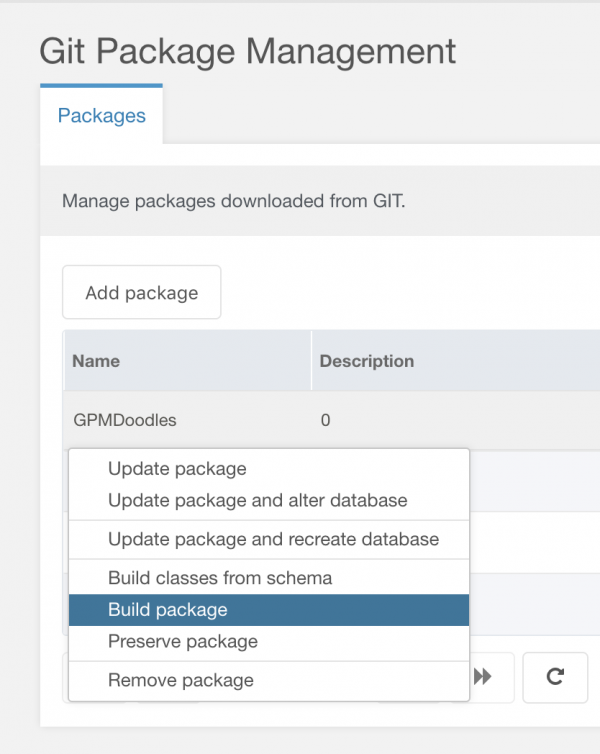
It all comes down to this! Under "Extras » Git Package Management" in the manager, right-click on your package name in the grid view and select "Build package".

NOTE: it's usually a good idea to "Update package" before building. For example if you recently changed the version number, "Update package" will ensure your package will be built accordingly.
GPM generates a couple of folders during the build, if they didn't exist already. _build/gpm_resolvers/ is for various install scripts. _packages/ will contain the built transport package, ready for distribution on modx.com.
NOTE: in certain environments the file permissions are not set properly on the generated package files. Run
chmod 0755 _packagesto access the files and check them into git.
Submitting an Extra on modx.com is a matter of logging in, filling out some form fields and uploading your transport package. The process does take some getting used to. Maybe yet another post...
