Why blog with MODX?
Medium, Squarespace, Wix, Wordpress, static site generators...the list of viable blogging platforms goes on and on. The discussion of why MODX is (or isn't) a good choice has been exhaustively covered elsewhere. Just google "why modx" or "modx vs wordpress" or visit modx.com. If you're wondering why MODX isn't more popular, check out this article.
Today, we're just assuming that you're taking the road less travelled and you want to use MODX to build a blog. Here's how you can get started in an hour or so.
Why this tutorial?
There's a tutorial in the MODX documentation about building a blog. In my opinion, it's a bit outdated and adds unnecessary complexity with features that maybe aren't all that important these days. At the same time, I wouldn't change that piece of documentation, as it's very helpful for those who want a more detailed picture.
Anecdotally, one can observe a trend in blog design towards minimalism (or at least, that a subset of bloggers want minimalistic design and functionality) and this tutorial is for them—or someone building a MODX blog for them.
Stuff you need
Remember this is about minimalism. The following gives you the bare basics, and not much more.
Install MODX
That's covered here.
System Settings
- Use Friendly URLs

- Site Name

Extras
You really only need a handful of MODX Extras to serve up the critical functionality for a blog. There are alternatives to the following, but unless otherwise indicated, all of these have been developed by a member of the MODX core team and are stable and well-maintained.
- getResources. Required for listing blog posts.
- Tagger. Probably required, for categorizing content.
- Collections. Probably required, as it makes managing blog-structured content WAY easier.
- getPage. Probably required, if you want to paginate your listings. Plus it can help with performance.
Bonus Extras
These aren't covered in this tutorial but you'll very likely want them or an alternative that delivers similar functionality.
- Markdown Editor. Some text editor is probably required, otherwise publishing would be a lame experience. There are other very good options.
- FullTextSearch. This is an Extra I recently released so it doesn't have the same adoption and traction as the others. However, I did spend 5 years on the MODX core team and have a few Extras in the official repo that I try to keep relatively well-maintained, if that quells the abandonware-Spidey-senses. FullTextSearch gives you useful search functionality and a customizable index, without any 3rd-party dependencies. The stock-standard SimpleSearch has its quirks but is seriously battle-tested and has been maintained by various core team members for many years.
- Ace. Code editor for use in the Manager. Community-developed Extra with lots of adoption, but infrequent updates. It works well and looks nice, for the codey bits.
- pThumb If you want to resize images on the web server, the best Extra to use IMO is pThumb, despite being outdated. It still works well, and comes with a resizing engine called "Resizer" that is fast and robust.
Implementation
We'll use Twitter Bootstrap's example blog markup. This github repo hosts an installable Extra that contains the MODX Elements in this build.
NOTE: If you're new to MODX, you should know that NONE of these Elements are installed by default. MODX comes as a clean slate. Templates and Chunks are Elements that serve the presentation layer. You put HTML in there, use MODX Tag syntax to include them, and MODX renders the HTML exactly how you configured it, with variable placeholders populated. This is generally accepted best practice, although everyone does things differently.
MODX Tags and Tokens
For brevity in subsequent sections, let's clarify some things about the MODX Tag syntax.
- MODX Tags begin with
[[and end with]](Yes it sometimes collides with JavaScript nested array syntax. Watch out for that.) - A Token may follow the opening braces.
- If no Token
[[is a Snippet call, meaning MODX will execute some logic stored in the Snippet object with the name referenced in the Tag, like[[getResources]]. - If asterisk
[[*Token, the value is fetched from the currently rendered MODX Resource (page). - If plus
[[+Token, the value is populated by either the containing Element's properties, or a Snippet that has been configured to populate placeholders of this kind. - If double-plus
[[++Token, the value is from the MODX config, or Settings. This can be a System Setting, Context Setting, User Group Setting or User Setting. - If dollar-sign
[[$Token, the value is the rendered content of a MODX Chunk with the name referenced in the Tag, like[[$head]]. - If tilde
[[~Token, the output value is the URI of the Resource with ID referenced in the Tag. For example,[[~1]]makes a link to the Resource ID1. The output can be modified with the&schemeproperty, to be fully-formed, scheme-compliant, absolute, or relative. - If exclamation
[[!Token (as the only Token or preceding any other Token) the output of the Tag is processed as uncacheable. This is for content that relies on user input, or dynamic content that can change per request. Note: it's NOT necessary to use this Token for content that changes per Resource—only content that changes per request.
- If no Token
Templates
If you open the code links in a new tab, you can reference the code while following the guide here.
You really only need 1 MODX Template to handle a minimal blog. This template contains the following MODX Tags, where "dynamic" MODX-y stuff happens:
[[$head]]calls the Chunk that contains the global<head>element.[[$header]]includes the Chunk with global<header>and navigation.[[$jumbotron-[[*class_key]]]]is one example of how to nest MODX Tags in a performant yet flexible way.[[*class_key]]gets theclass_keyattribute from the current Resource. In this build, only two values will be used:CollectionContainerormodDocument. The former is used for the blog container, where the latest blog post is used to create the jumbotron. The latter is for blog posts themselves, wherein the post title and metadata go into the jumbotron. MODX parses the nested Tags first. In the case of a blog post, the resulting Tag that is formed would be:[[$jumbotron-modDocument]], which is exactly what we've named one of our Chunks. (The other one being[[$jumbotron-CollectionContainer]].)[[[[*class_key:is=`CollectionContainer`:then=`!$blog-listing`:else=`$blog-article`]]]]is another tricksy way to form MODX Tags. We run a conditional check in the nested Tag. For aCollectionContainerwe'll end up with[[!$blog-listing]]and for a post we'll get[[$blog-article]]. These Chunks have different uses. Note the!token for the blog listing. That allows us to serve dynamic content, like a user-filtered list of blog posts.[[$aside]]displays the sidebar element.
Chunks
head
This contains only a few MODX Tags. [[*pagetitle]] will be populated with the title from the current page, and similarly with [[*description]]. [[++modx_charset]] is a system configuration, often "UTF-8". [[~[[*id]]? &scheme=`full`]] creates a fully-formed URL, including scheme, hostname, path and basename, valid for the current Resource. [[$styles]] calls the styles Chunk, which contains CSS link and style tags.
**UPDATE: thanks to @lucy_i from the MODX community for pointing out that this example was missing the <base href="[[!++site_url]]"> tag, which is common to MODX sites but not a universally used method of enabling relative links. MODX by default generates links relative to the site_url config variable. Unless you change that, you'll want the base tag to make internal links work :)
header
This has a bunch of example markup for a header with features like newsletter signups, and search. Subscriptions are outside the scope of this tutorial, but here's the MODX-y stuff:
[[++site_start]]is a placeholder for the ID of the Resource that is the homepage of the site. The System Setting with the keysite_startholds this value. The default value is1, so the outer Tag is formed as:[[~1]], generating a link to the homepage. We will see[[++site_start]]again, soon.[[++site_name]]is another System Setting, that we customized above.[[TaggerGetTags? &groups=`2` &rowTpl=`tag_link` &showUnused=`1`]]calls the Snippet TaggerGetTags, which comes with the Tagger Extra. It returns a list of Tagger tags, using thetag_linkChunk as a template, resulting in the main menu of the site. The&showUnusedproperty tells the Snippet to show all tags in the tag&groups2regardless of whether a Resource has been tagged with it. You can also pass the alias of the group, likecategory. Refer to the Tagger documentation for more details.
jumbotron-CollectionContainer
This is for the blog container. It pulls post meta data from the latest blog post and populates the jumbotron element.
[[getResources?
    &parents=`[[++site_start]]`
    &depth=`0`
    &limit=`1`
    &tpl=`post_meta`
]]
getResources is a utility Snippet for listing MODX Resources. The &parents property tells it to list Resources that are children of the Resource with this ID. In this case, we're setting it to the homepage, which is also our main blog container Resource. The &depth property tells it not to recurse down the Resource tree—in our case all the blog posts are immediate children of the blog container. We will handle taxonomy with the Tagger Extra and avoid complicated nesting of Resources. The &limit property tells it to only return 1 result. We just want to populate the jumbotron, not list a bunch of posts—that comes later.
The &tpl property is likely the most interesting, if you're new to MODX. It references a Chunk that will be used as a template for each returned post. The template gets all the attributes of the Resource passed to it as placeholders. We'll examine that next.
post_meta
The placeholders herein are populated with Resource field values by the calling Snippet, getResources.
[[+pagetitle]]gets the Resource's title.[[+description:is=``:then=``:else=`<p class="lead my-3">[[+description]]</p>`]]is a conditional that wraps the value of the description field only if the field isn't empty.[[+publishedon:date=`%b %d, %Y`]]utilizes the date output filter to format the publishedon timestamp to be easily readable.
Whatever the number of Resources returned by getResources, it would apply this template Chunk to each of them and output the collection of results. This behaviour is highly customizable with powerful templating features. Read more on getResources here.
jumbotron-modDocument
The individual blog posts show a jumbotron element that's just a wee bit different—it does not include the Resource's description field. This is an example of how MODX Chunks help us stay DRY. We can call the [[$post_meta]] Chunk directly. It doesn't have to be called by a Snippet. We're not passing in the &description property, so the conditional inside the $post_meta Chunk evaluates to an empty string and omits the <p class="lead my-3">.
blog_listing
This is where we list blog posts on the blog container.
[[!getPage@blog? &cache=`1` &element=`getResources`
    &parents=`[[++site_start]]`
    &depth=`0`
    &limit=`8`
    &includeContent=`1`
    &tpl=`blog_listing-item`
    &where=`[[!TaggerGetResourcesWhere]]`
]]
The getPage Snippet paginates the output of the Snippet named in the &element property. It can &cache the results based on the request parameters. So &page=2 would be cached separately from &page=3, for example. The other properties are passed to, and configure, the getResources Snippet. One gotcha here is &includeContent, of which it is good to be aware. To this day (literally as I'm writing this actually) I get caught out by that one. If you expect to access the content field of the Resource inside the specified &tpl Chunk, then you must tell getResources to &includeContent—it's disabled by default for performance and memory-saving.
The &where property is a very powerful feature of getResources. You can read more about it in the documentation here. In this case we're calling the TaggerGetResourcesWhere Snippet. The Tagger Extra installs a Plugin that routes requests to a MODX Resource, turning URL bits into GET parameters. For example https://example.com/category/world would become https://example.com/?category=world on the server, but in the browser the pretty URL would be maintained. TaggerGetResourcesWhere turns the GET parameters into a WHERE clause, formatted with JSON syntax that the getResources Snippet can parse and add to its query.
The result of the MODX Tag above, with the GET parameters category=world in English: "Get up to 8 Resources that are direct children of the homepage blog container, and are tagged with the category world, then template each result with the blog_listing-item Chunk." We dive into more detail about how to set up Tagger, below.
blog_listing-item
This Chunk has more placeholders for Resource fields. Note the output modifier syntax that can actually call a custom Snippet [[+content:firstp]]. That Tag passes the value of the content field to the Snippet firstp in the variable $input. The Snippet is described in greater detail below, but it contains logic to return the first <p> tag in the input.
blog_article
This one is about as simple as it gets. It just wraps the currently requested Resource's content field in some markup.
aside
"Aside" from regular HTML, there's one MODX Tag here: [[TaggerGetTags? &groups=`1` &sort=`{"alias":"DESC"}` &rowTpl=`tag_li`]], which uses the specified template Chunk to format the output of the tags in &groups 1. Note these tags are sorted by their alias—more on that later.
Snippets
firstp
The only custom business logic in this site build, instantiates php's DOMDocument class and uses it to extract the first <p> element. The rest of the Snippet and Plugin code is installed with the Extras, listed above.
Taxonomy
Tagger is the all-in-one taxonomy management utility in MODX. Conceptually, it's like MODX Template Variables (TVs) and similarly has a high-degree of flexibility, but the tag values are restricted to 100-character strings. The Snippet queries that it facilitates are more performant than those using TVs for taxonomy (most noticeable at scale).
Tagger installs with what is known as a CMP ("Custom Manager Page") to manage tags.
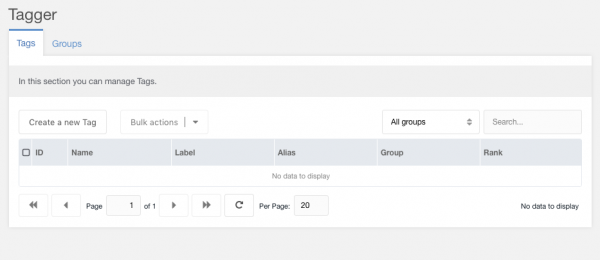
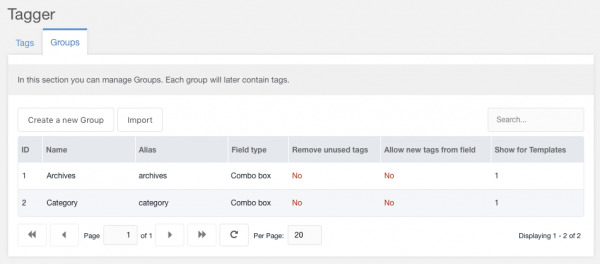
You start with tag Groups, because every tag must belong to a Group. There are a lot of options to choose from when setting up your tag Groups—the Tagger documentation has all the details. In our build, we have Category and Archives. One of the required Group setings is to make them available to our Blog Template.
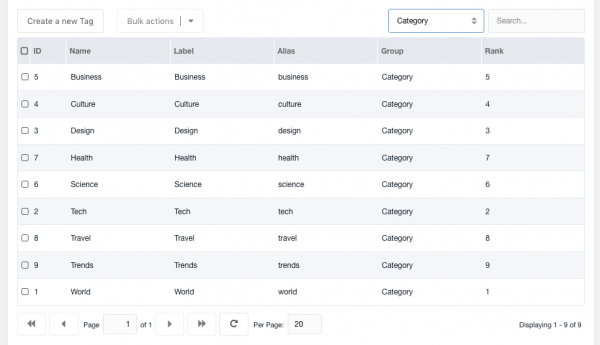
Then we create tags under each Group. The main navigation of our example blog demonstrates a common use case for blog post taxonomy, wherein each post belongs to a category and the main navigation takes you to a page that lists all posts assigned to a certain category. The TaggerGetResourcesWhere implementation on the blog container achieves this for us. We just need to create the tags under the Category Group, and assign posts (Resources) to those tags.
We do this for Archives as well. You could execute a bunch of complicated logic around post publishing timestamps, in order to facilitate archival functionality, but actually this does the same job, and gives the publisher the ultimate decision-making ability on the archival scheme to use and how to assign each post. Really, time-based archives are just arbitrary groupings of posts—maybe you want to do it weekly or quarterly. Tagger lets you do that, and it's a much, much simpler implementation from a codebase standpoint.
In our case we've just created some tags based on month.
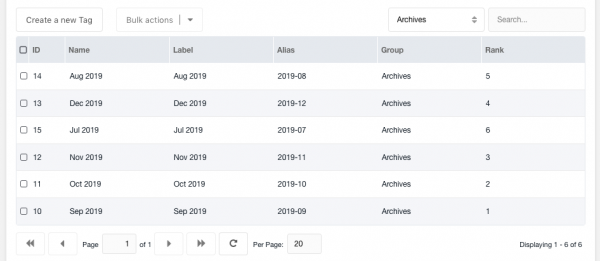
One little trick to note here is that the alias of each tag uses a sortable date format yyyy-mm and the name and label are of the more human-friendly type "Sep 2019". This supports the use case of sorted date archive links in the $aside Chunk as described above. You can configure it however you choose, though.
Resources
Homepage / Blog Container
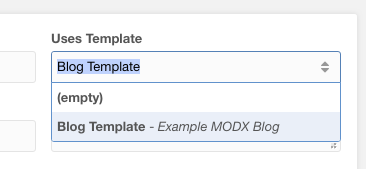
On installation, MODX comes with one Resource—the homepage. If you attach the Blog Template from this tutorial to it, you'll be able to preview this simple blog in all it's minimalistic glory at the base URL of your site.
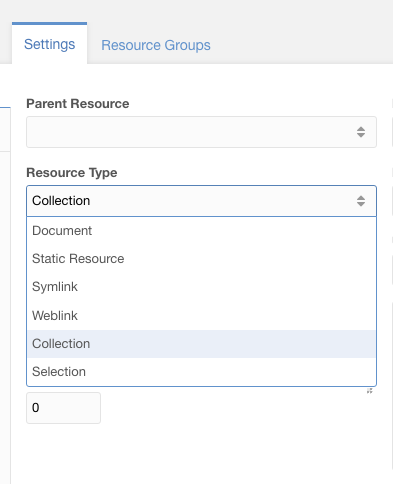
In the Settings panel of the Resource, change the Resource Type to Collections, and save.
You should now see a Collections Container grid view. Once you've created some child Resources (blog posts) it should look something like this:
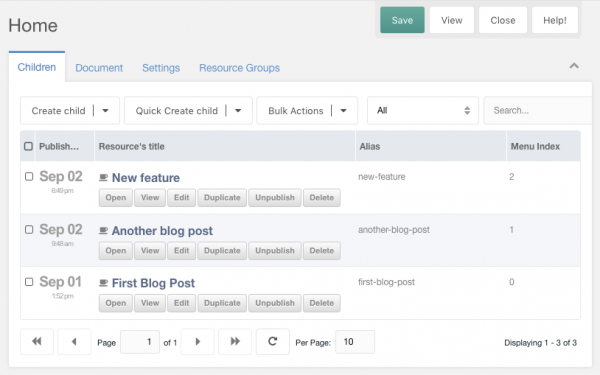
This view is paginated, and the Collections Extra enables a whole bunch of conveniences and settings to make managing a collection of Resources, like a blog, WAY better. It's the much-improved and less-opinionated version of the Articles blog engine. Read more about Collections in the documentation.
Demo
A MODX Cloud site has been deployed with only the Elements described here. You can view it at: http://example-blog.sepiariver.modxcloud.com/. To reproduce the same result:
- Start with a fresh MODX 2.7.1 install.
- Customize the System Settings, as described above.
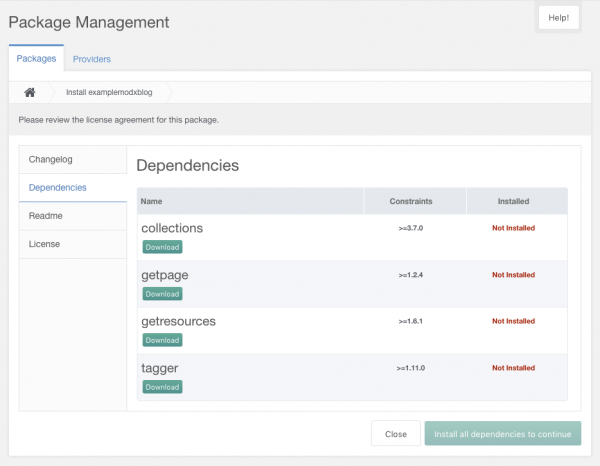
- Install the package in the repo. You do that by selecting "Upload a package" from the dropdown button in the Extras Installer.
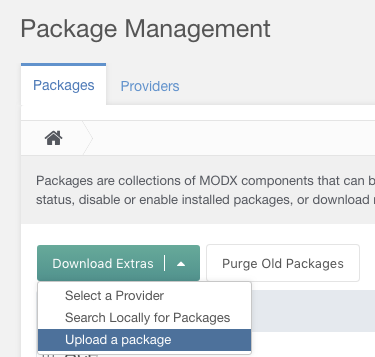
- Follow instructions to install dependent Extras.
- Make the Template and Resource Type changes to the homepage, as detailed above.
- Set up Tagger as described above.
- Create a blog post.
That's the quick and easy way. Happy MODX-ing…or blogging…or both!
